In This Article:

What are departments?
Departments are a quick and easy way to split invoices or items within Plate IQ. Your departments will need mirror your accounting software departments or classes in order to properly split and export.
How are departments used?
Departments are commonly used in two ways:
- Location Based - Splitting an invoice or item across locations. For example, you receive an invoice from your insurance company that needs to be allocated across several locations.
- Revenue Center Based - Splitting an invoice or item across revenue centers within your location. For example, you receive a case of lemons that needs to be allocated between the kitchen and the bar cost centers.
Departments Setup
On the top right, click the down arrow to access Settings.

Once in Settings, click Departments on the left. Click the Add Departments dropdown to get started.

You can Add Departments individually or Import Departments from a CSV export from your accounting software.
To add a department, click Add Department.
Enter the department information:
- Name - Name of the department
- Code - Department code from your accounting software
- Accounting SW ID - (Optional) - Depending on your accounting software
- Company - Select your company name from the dropdown
Once you select a company, a location selector will pop up. You can choose All, None or Select individual locations by clicking the check box next to them. This feature can be used differently depending on your situation. If you are using departments to split an invoice across locations, you will want to select the location that is receiving the invoice or you may need to setup a corporate location within Plate IQ to successfully use departments in this manner. In the case of revenue center splits, select the location(s) that will have invoices or items split by these departments.
Click Save when finished. Repeat for multiple departments.

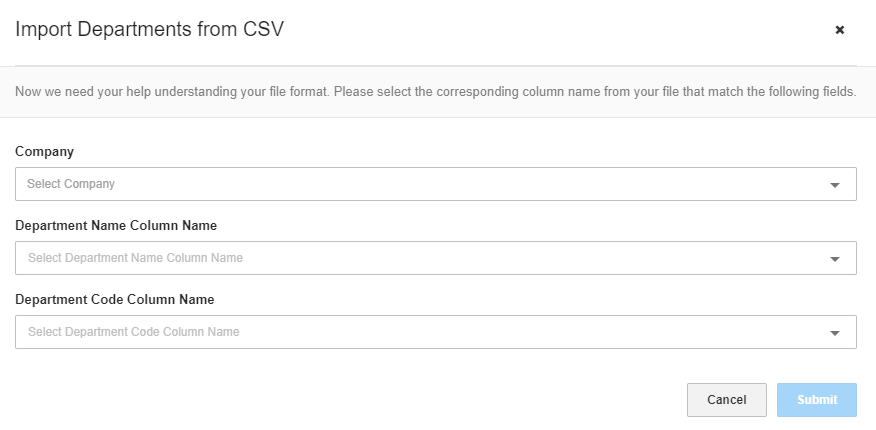
To import a CSV from your accounting software, Click Import Departments.
A pop up will ask you to upload your CSV file.

The next pop up will ask you to assign your columns to our upload columns. Select the matching columns from the dropdowns.
Click Submit when finished.

Departments Usage

Click Save when finished. Repeat for multiple departments.

After your departments are setup, you can begin splitting invoices or items from the Invoices tab.
Select the invoice, under the Line Items, you will see a Choose Department dropdown.
Select your GL Account and Department. It will autosave, you can edit from the bottom of the page if needed.

You can also split the item by clicking the split icon. Click Save when finished.

Was this article helpful?
That’s Great!
Thank you for your feedback
Sorry! We couldn't be helpful
Thank you for your feedback
Feedback sent
We appreciate your effort and will try to fix the article